Sunday, January 27, 2013

20 DIY projects you NEED to try

Hey Guys! How are you all today? 


Well do I have a Post for you today or WHAT! Well, I Know a lot of you are really busy with work and parenting. So you don't have time to search the internet for DIY projects! So, In today's post I'm doing all the hunting for you! I have Tanner's top 20 DIY must do's! 

Here goes, Are you ready?  (There in no particular order) 

1.  Fabric-Covered Resin Table Redo


Who wouldn't want a table like this?! You can use any fabric to give that custom look. 

2. Cork Bath Mat 


One of the reasons I really want to try this one is just to be different, Because I don't know anyone with a Cork Bath mat. Plus, It would be alot easier having that there instead of having to put down and pick up a towel every time you take a shower. (or atleast thats what I do) 

3. Custom Coach Pillow


This would be a perfect gift for someone. It's perfect because you could take some of your friends pictures of Facebook or somewhere and turn them into Pillow that they would cherish FOREVER!  

4. Decoupage Table 


Here's another Table that you can use Fabric with!! Can you believe it? I love this so much that I will be doing a video on it really soon. 

5. Sliding Storage System


Now, I don't have a garage like this, But If I did I would SO install these because EVERYONE is always needing creative storage solutions. (If you don't, you aren't normal) LOL.

6. Spray Bleach Shirt


BLEACH and Vinyl. This would be cool to do custom shirts with Silhouette images and the cost would be UNDER 5 dollars, EASY!

7. Pallet Table 


If your like me, Your calling everyone you know to see where you can get your hands on some pallets!! Tip: Check Craigslist. I found some ads on there where there giving them away for FREE! I'm sure you can find some, too!

8. Custom Stamp


What a great stamp idea! If you want to give something a special feel this DIY is for YOU!

9. Shutter Mail compartment


Please. Everyone with that cluttered table by there front door, Go to home Depot and get a shutter! Only keep mail that can fit in it, and throw away all that junk mail that you have sitting on that table. It will look so cool, No one will notice the mail!


10. Duck Tape Candles 


Duck Tape. Who doesn't love crafting with duck tape? This is a simple DIY craft that is easy under $5! 


More Crate DIY! If you are trying to get that southern charm for your house, Try this! I think it would look SOO good! 
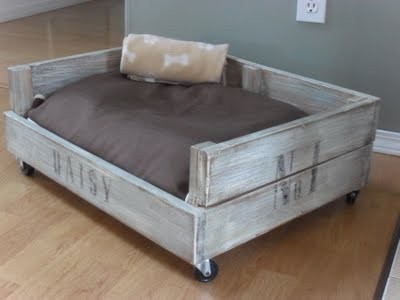

DOG LOVERS-- I need to make about 5 of these, Since I have about 10 dogs! But it's custom and fun! If one of your friends have a dog and you need to get them something, Make there dog something! They will love you even MORE! 


I LOVE THIS! It's great and cheap to customize rooms, All you need is the curent Switch plate, Fabric, and Mod Podge. 


Everyone should try these great DIY dog treats, I'm sure your dog would love them!


Trying to decorate your outdoor patio on a budget? Well you can make this, Then all your friends will be jealous they didn't think of it!


Now come on guys, We both know you have those UGLY chester drawers. I have them too. Why don't you spend next weekend DIYing them? Totally worth it. 


My Mammaw LOVES glitter, But hates the mess. If you want to decorate your house with glitter and no mess, This is for ya! :) 


Go get your OLD and NASTY cookie Sheet, Lets turn it into a serving tray that your kids could play with, Or you could use it for your home! 

19. Custom Moss Letters 


Is it just me or does this look super cool? I think this would be great for words outside!


20. Custom Pallet Bed 


Have you always wanted to make that empty bedroom in your house a guest bedroom, But don't have guests THAT much to spend on a bed and everything? Well, go get some Pallets and make you a bed! :)


WOW!!! I have had so much fun going finding some of my favorite DIY projects to try.  Did you all enjoy it? Are you going to try any? 

Let me know what you think--Wanted to change it up a bit! 

Have a great day. 


Friday, January 25, 2013

DIY: Turning a iPad box to a Memory Box

Hey Blogging friends!! How are you all today? 

Well, Today I'm going to be sharing with you a little DIY Project I was working on this week. It's pretty fun and since ALMOST everyone I know either has a iPad or got a iPad this Christmas season, I knew everyone needed to know SOMETHING to do with the box! 


Now I am really pleased with myself about how it turned out. I couldn't of asked for any better results! But I couldn't made it happen if it wasn't for my NEW Lawn Fawn paper that came out at CHA, The "Dolphin's Closet" and "Pink Limonade" Those have to be my TOP Fav paper of the Winter CHA show! The thing I love about Lawn Fawn is that they now have my favorite type of stickers, Cardstock Stickers!! So the Waves at the bottom, the sweet memories, and the Banner at the top are ALL from Lawn Fawn's NEW collections! Be checking there website for when there available to order. 

What I also used for this to come together is Mod Podge. I think almost everyone knows what it is, It's a DIY'ers MUST have. Mod Podge is a waterbase sealer, Glue, AND finish! So I used the Mod Podge to glue everything to the box then I used it again to put a nice finish over the paper. That way it has a nice feel to it and gives it a Gloss finish! Make sure to check out Mod Podge if you haven't. You can pick it up at any craft store, I got mine at Hobby Lobby

Here's a Video tutorial! 

Click here to watch on Youtube


Here's what the box looks like on its side : 

Here's what the box looks like on the bottom : 
Supplies : 
-iPad Mini Box 
- Mod Podge
- Dolphin's Closet Paper pack
-Pink limonade Paper pack
-Foam paint brush (to apply the mod podge)
Coordinating cardstock stickers by Lawn Fawn 


Hope you enjoyed today's DIY projected! If you enjoyed it, Maybe you should share it with your friends on Facebook, Pinterest, or Twitter? 

Thanks for stopping by! 
Have a great day.

Wednesday, January 9, 2013

Card Making Wednesday!

Hope you enjoy this week's Card Makin' video! Off to LA for CHA early early tomorrow morning!


Tuesday, January 1, 2013

GIVEAWAY!!! (Open)

Hey GUYS!!

Happy New year!  We have a GREAT giveaway going on over on are Youtube channel and I know you want to enter!


Were giving away THREE Stamp sets and MORE!


All you need to do is subscribe to tannervlogs1023 LINK HERE : http://www.youtube.com/tannervlogs1023 and COMMENT on this video saying you subscribed to my vlogging channel! So Good luck with this Giveaway!

I WILL PICK A WINNER JANUARY 7th, 2013!! 

Have a GREAT DAY! 

Wednesday, December 26, 2012

CMW- Lawn Fawn

Hey Guys!

Merry Day after Christmas! I hope you all are doing great, I Know I haven't Blogged in FOREVER.

But I have about 3-4 videos pre done, for the next few weeks :) I know you all better be proud.

In Today's video I'm featuring Lawn Fawn Paper!
I really love this paper and I love the owners, That I got to meet at CHA summer 2012! 


The Sentiment you see is from Hobby Lobby, But you can use any sentiment from your collection.


So I hope I inspired you to make a really cool card and make sure to come back here EVERY Wednesday for card makin' Wednesday!  I'm still trying to get my DIY Friday stuff done.

It's really crazy how I do so many different videos, from my Vlogs, and producing videos for other companies, Its pretty crazy! But I have SO much fun doing it. I hope you all bare with me as I get my "Work" together, If I haven't replied to your email PLEASE resend it and I will reply! I will so un-connected. I'm working really hard on everything because I know CHA is CRAZY and I want everything else to be took care of.


Have a GREAT DAY!!


Wednesday, December 12, 2012

Winter Wonderland/ Card Making Wednesday

Hey Guys! So I have been super busy lately and not really anything to do with the Holiday season. I've been sick and just a lot has been going on... So today's video I've made a really fun card! 


So I hope you enjoy today's blog post and Video Tutorial! :) 

Have a GREAT DAY! :D 


Wednesday, November 28, 2012

Card Makin' Weds-Happy Birthday!

Hey Guys! Happy Wednesday! Only two more days after this and its the weekend! So I hope your having a pretty good week, It's super cold here. But its suppose to warm up this weekend so it all good! 

But let's jump right into today's post! 
I made this card yesterday and It ALL came to me as I was itching to make a card yesterday morning! I LOVE this card! You really should watch the Video to see how it was made and how awesome it is.
Click HERE to watch on Youtube (You will see it a lot better!)


Here's what you will need : 

Card base 4-1/2 by 11 before scored (4-1/2 by 5-1/2 scored in the middle at 5-1/2)
Autherntique paper Pack 
Random Hobby Lobby stamp set 
Zing Embossing powder 
White Gel pen 
Adhesive of your choice 
Embossing Pad 
Fiskers border Punch 

After you go around the craft room and gathered all the Supplies lets get started! 

1. Score your card base at 5-1/2 
2. Cut your layer paper 3-1/2 by 5-1/2 (This is the white paper you see on my card)
3. Take your fiskers border punch and punch about 6 inches long (gives you room to cut off the edges of the layer) 
4. Attach the border punch to the side of the layer using adhesive 
5. Put your layer paper down with your border on the side down to your card base, Make sure its all even around all four edges! 
6. Stamp with black ink your Candles stamp, Then Color with your choice of marker/Colored Pencils
7. Stamp the happy Birthday with embossing ink, Then take the embossing powder over it. It's nice to have a scratch paper for all the excess Embossing powder to go. 
8. I cut a banner out of the paper pack with a par of scissors, You can do the same or if you don't have to paper pack get creative! I'm sure theres something in your craft room that will work :) 
9. Take your Jell Pen and make tick lines around the edges of the card base, Its a great affect to really pull the card together! 

Hope you enjoyed today's tutorial! 

Hope you all have a GREAT Week and see you back here Friday for a really awesome DIY Project! 


Wednesday, November 21, 2012

Card Making Wednesday


Hey Everyone! 

Today I am so thankful to be guest designing for Card Making Wednesday for Tanner! I have 2 cards to share with you today! Last night I pulled out my scarps and made lots of cards, I am going to share 2 with you today, and the rest another day! It was so fun using scraps, and I actually really like a lot of them! 


This first card was SOOOO simple! I cut thin 4" strips and adhered them to a piece of printer paper, stamped my sentiment on the top one, and added some beige twine with a "bow". I then stamped some hearts in pale ochre Archival ink down the left side! 


This second card is also quite basic! (if you didn't know I am a very simple card maker!)
If you look closely you can see, I used a technique Tanner shared in this awesome video HERE


 Thanks for joining us today and Have a very Happy Thanksgiving! 
~Court


Thursday, November 15, 2012

EXCITING NEWS! :)


What's Up Guys?! 

I am going to share a LOT of Exciting and FUN news with you today!! :) 

I have been sick and sorta out of the "Loop?" this week. Being REALLY sick just for like a day and a half really stinks! Anyway, Megan from Above Rubies Studio where I do TNT videos every once and a while.. I am SOO Excited to being doing a video/Post EVERY OTHER Thursday doing a TNT (Tip and Trick) video! How exciting is that?! I really love working with Megan and I've knew her for about 3 years and been talking to her for almost a year and a half! 
So make sure to go over every other Thursday and theres always awesome posts by Megan too! :) 

Now Make sure to check out Megan's Video HERE to hear about all the exciting announcements! She's gots LOTS planned! We ALSO have a GREAT Giveaway of a DIE CUTTING Machine... So MAKE SURE to check it out!!!! :) 

Alright, Hope you have a great day and Hope you are just as excited as me :D 


Wednesday, November 14, 2012

Card Making Wednesday!

Hey Guys! I've been awful sick since Tuesday morning around 3am.. I won't get into details but I've felt AWFUL! 

Anyway Here's a video I Pre-Recored for Today! 


It's a REALLY fun and simple card, Just a different sketch which will make people think it took longer! Haha! 

Hope you all have a great day and feels a lot better then me! 

Friday, November 9, 2012

DIY Friday, Christmas Box!

Hey Everybody! I really love this DIY Friday video/Post! It's really fun and I enjoyed it a lot! 

In this video I'm going to show you how to make a really simple box to store your Holiday cards for the season. 

What you will need : 
-Scoring board ( I used a Martha Stewart one)
-(2) 12x12 sheets of Card-stock
-Adhesive 
-Scissors 
-Embellishments (Only if you want to decorate your box!)

After you've gathered your items, Let's get Started! 
1. Score your first sheet of paper at 3in and score at 9in 
2. Turn the paper and score the paper again at 3in by 9in 
3 Take the second piece of paper and score at 3in by 9x1/8in 
4. Turn the second sheet of paper and score at 3in by 9x1/8in
5.Take your scissors and cut a line from each corner of BOTH sheets of paper, Make sure to stay on the scored lines! 
5. Put adhesive on the flaps of where you cut, and start making your box stand up.You will have to do this to both sheets of paper, then you will have two half boxes! 
6. You can decorate your top part of your box or leave it blank, Your choice! 
7.That's it! Enjoy your box :D 


I Love this finished project! :) 


Notice how I used Megan Elizebeth Chipboard stickers? I LOVE THEM! :) 

Hope you all have a Great day and enjoy the weekend! I will be doing a lot of stuff! 

Saturday were going to the Zoo then Sunday we have church, Then after a lunch I'm getting Baptized with my two Cousins! :) 

Thanks for stoppin' By! 


Wednesday, November 7, 2012

Card Making Wednesday-Birthday/Halloween!


Hey Guys! Yesterday was my moms birthday and in todays video I show you how I made it! I Really enjoyed making it and I was inspired by Kristina Warner! She's hands down the best card maker/ Video teacher! :) 


Click HERE to watch on Youtube


Make sure to Check Kristina out HERE!         Click HERE for the Candle Cameo file made for you all, By Court from Courts Craft corner!  All you have to do is download it and open the file, Then cut it :) 
Below is what I cut from the Cameo : 


Here's another card we made Featuring these Awesome Candles! All you do is cut Rectangles and then use your cameo to cut the Flames! So again its a great file to have. Pick it up HERE


Now, We have a SPECIAL Guest Designer, Julie Ranae


Even though Halloween was a week away, I think this is a GREAT card! I absolutely LOVE it. Julie used Diamond/Chevron Grunge set, Check it out HERE 

I love how she stamped right onto pattern paper! :) So make sure to go over to Julie's Blog HERE and check out all her other amazing Projects! :) 


So I hope you enjoyed all the awesome stuff that I showed you today! :) Make sure to have a great day. I hope you enjoyed it. 

Monday, November 5, 2012

No more stamps- Bitter Sweet.

Hey Guys -- 

So I won't be doing anymore stamps :( It took so much time and effort and never got a good enough return. I feel I could be doing something SOO much better and getting a even better return, I Know lots of you love the stamps! But there are lots of other stamp companies out there. 

I'm really excited about what I will be doing now :D I will be doing videos and working with other crafters in the industry.  BUT we have a really great sale going on for you! :D 
ALL The stamps that are still in stock are ONLY 10 DOLLARS!!!!! :) 

So go over to the store and check it out HERE! This won't be the last time seeing me for Sure!!! :) I have lots of other things I will be doing, I will be at CHA doing videos and finding all the NEW awesome products. 

I still love designing and I've learned so much. I used to get lots of emails about how to start a stamp company, So if you need any help starting a stamp company or any questions please give me a email at Tanner@tannerbelldesigns.com and I would be happy to help you and give advice :D 

I will be doing lots more of awesome-ness and excited to get started! 

ALSO-- If you own a Mr.Cricut Crazy "Birthday, Birthday" I have a REALLY GOOD friend that would like to buy it from you! :) So If your interested please email me with what you would sell it to her for! :) 


So I hope you all support me threw my change and Hope you have a GREAT day! :D 

Friday, November 2, 2012

Canvas Home Decor - DIY Friday!


Hey Everyone! Today for DIY Friday, I've Decided to put paper on Canvas. Now when I thought of the idea, It didn't sound fun at all, BUT believe me, It is TONS of fun!!! :D I will be doing these a lot because there so easy to do if you have the right steps, Which I show in the video below. 

What you will need for this project : 
- Canvas (I used a 10x10 Canvas Corp Canvas)
- Mod Podge of your choice 
-Pattern paper of your choice 
-Sponge Brush for applying the mod podge! 

With those four simple things you are ready to get started making this! 

First, Take the mod Podge and cover your canvas. 
Second, take the paper and put it face down, With the Pattern facing the table. 
Third, take the canvas and put on top of the paper (Make sure its lined up!) and apply FIRM pressure! That is the best way to not get air bubbles 
Lastly,  Put One or two coats of mod podge on the paper to give it that great finish! :) 

Now you can make a couple of them for a Quick Christmas gift, Decoration around the house, The possibilities are endless! 

Enjoy the video : 


Click HERE to watch on Youtube. 


Let me know how you liked this tutoriel! Hope you have a GREAT day!